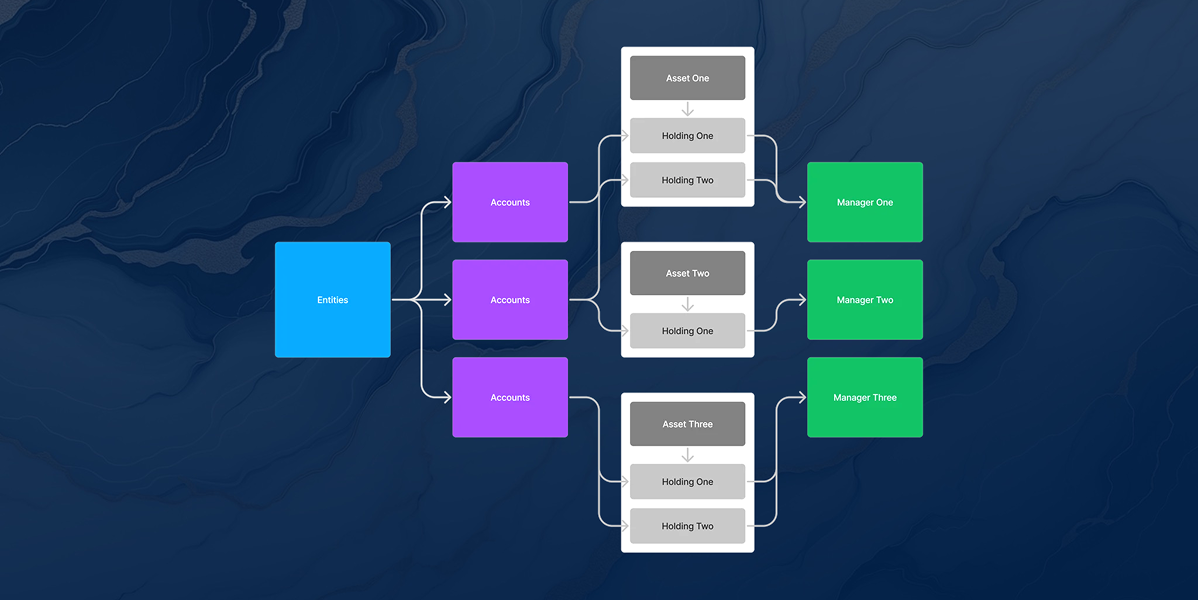
How Copia’s Data Model Works
Before adding data, it’s important to understand how Copia organizes information. At a high level:
-
Entities define ownership and legal structure
-
Accounts store balances and transactions
-
Assets represent individual investments
-
Holdings connect assets to accounts and entities
-
Managers group assets by institution or investment relationship (with Strategies or Categories available as additional organizational layers depending on workspace configuration)
These components are interconnected. Actions taken in one area directly affect reporting, dashboards, and automation throughout the platform.
Data Logic Mental Model
- Entities create structure
- Transactions are used to calculate Metrics
- Transactions live inside Accounts, which associate with Holdings and Entities
- Holdings live inside Assets
- Assets bundle up to Managers and Classes
- Assets bundle up to Managers and Classes
- Holdings live inside Assets
- Transactions live inside Accounts, which associate with Holdings and Entities
- Transactions are used to calculate Metrics
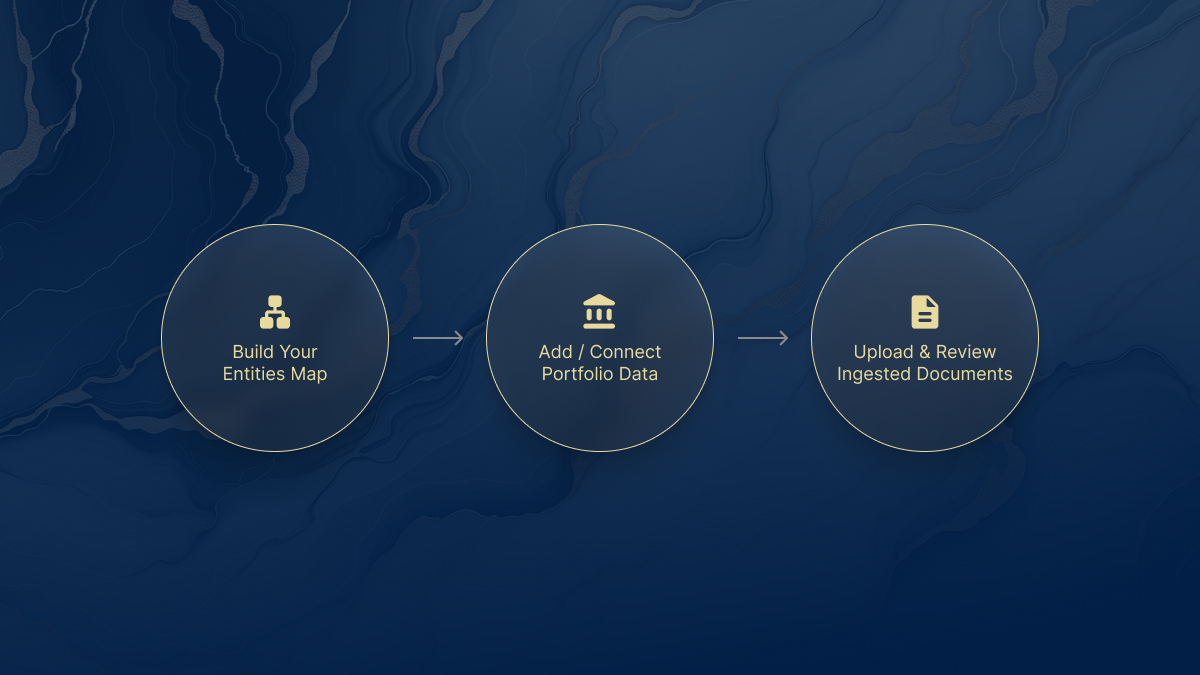
Recommended Sequence
To align with Copia’s data model, follow this sequence when onboarding a new workspace:
-
Build your entities map
-
Add or connect portfolio data
-
Upload and review processed documents
This order ensures ownership is established before balances, transactions, and documents are introduced into the system.
Building Your Entities Map
Creating entities establishes your ownership structure before any financial data is introduced.
When a new entity is created, Copia automatically generates a virtual account named after that entity. This ensures the entity has an account available for holdings, transactions, and document activity from the start.
Creating entities first ensures all future accounts, assets, and documents attach to the correct ownership structure from the beginning.
→ Continue to: Entities
Adding Portfolio Data
Copia supports multiple ways to populate your workspace. Within Accounts and Connections in the Copia Wealth web app:
-
The Connected Accounts tab allows you to link financial institutions and automatically sync balances and transactions.
-
The Portals tab lets you connect investor portals and ingest statements and documents for processing.
-
The Virtual Accounts tab allows you to create accounts for tracking transactions that are not connected to an institution.
For bulk setup or migration of existing data:
-
The Spreadsheet Importer in the Admin Portal (Back Office) provides another way to upload accounts, holdings, and transactions directly into Copia.
→ See: Spreadsheet Importer
Each method feeds structured information into your portfolio, helping ensure reporting and performance data remain accurate and complete.
Using Documents as a Data Source
Documents are more than file storage in Copia. When processed by Copia AI , documents can extract transactions, valuations, and structured data that feed directly into your portfolio. Documents can be ingested through a portal (as mentioned above) or added manually in the Documents section.
→ Learn more in Documents
When to use the Admin Portal (Back Office)
Most day-to-day portfolio activity happens in Copia Wealth (Front Office). Connecting accounts, adding documents, creating entities, assets and managers are all available features.
There are situations when Admin Portal (Back Office) is ideal for:
- Spreadsheet importing of accounts, holdings, transactions
- Holding management for assets
- Data ingestion validation and bulk document associations
→ See: Admin Portal Overview (Back Office)
Understanding this distinction helps ensure tasks are completed in the correct system. Contact us if you need help with any of these steps.
Next Steps
-
Watch or read the Copia Wealth Overview to understand how the platform is structured.
-
Begin building your ownership structure in the Entities Map Lens.
-
Continue through the onboarding flow using Accounts & Connections & Documents
Following this sequence ensures your Copia workspace is structured correctly from the start. Reach out to Copia Support if you have any questions along the way.