
Use the spreadsheet importer to bulk add assets, transactions, accounts, and holdings.
What Is Spreadsheet Importing?
A convenient method for entering Asset/Holdings and Transactions into Copia. You can use your own spreadsheet template, or Copia's template. This feature is particularly beneficial when you need to import a large amount of data into Copia and is often used to speed up the initial onboarding process.
Download the Copia Import Spreadsheet template here.
Creating a Spreadsheet ready for Import
To prepare a spreadsheet for importing into Copia, you need to ensure you have the required data. There are three types of spreadsheet imports: Assets/Holdings, Transactions, and Accounts.
Generally, we recommend importing your portfolio in three steps.
- Import accounts (after building your entity map)
- Import assets/holdings (because holdings need accounts)
- Import transactions (because transactions need holdings/accounts)
Asset Import Template

Note: An asterisks is a required column. If you're using your own spreadsheet, pay special attention to the columns headers. You'll have an opportunity to match these when you upload your sheet.
- Asset Name*: Enter the name of the Asset. The name of the Asset should correspond to what you want to refer to the Asset as within Copia.
- Short Name: Similar to a Nickname. Shows up in several places in the front office.
- Holding Name: You have the ability to add one or multiple holdings to an asset. The default holding name is "Holding 1."
- Asset Class*: A dropdown menu for selecting respective Asset Class! Please make sure to use the dropdown list as failure to do so will result in errors!
- Manager: Select the Manager that is tied to that holding. Remember, if you are managing the Asset it would then be classified as Self-Managed.
- Account*: Specify the Account in which you want to assign the Asset. Please note that the Account should already be present in Copia. It can be either a connected or virtual.
- Last 4 Digits or Equivalent: Enter the last four digits of the corresponding account.
- Inception Date*: Enter in the the initial date of the holding's existence. Remember, the initial transaction does not necessarily have to be a buy for the holding.
- Market Value*: The value of the asset as of the time of the import. You can edit this easily later.
- Capital Committed: The total Capital that has been committed (you'll add capital call transactions later.)
- K-1 Eligible (yes/no): Refers to Assets that require issuance of K-1 Statements. These Assets are pass -through securities where income generated by the assets passes through to individual owners/beneficiaries.
- Domiciled Country: The country in which the asset is based.
- Reporting Currency: The reporting currency for the Asset.
Transaction Spreadsheet Import

- Asset Name*: Enter the Asset name exactly as it appears in Copia. Be cautious of any potential typos or extra spaces, as they may prevent Copia from recognizing the Asset.
- Holding Name: The Holding that you want this transaction to be associated with in Copia.
- Account*: Enter the account that the transaction should be associated with.
- Date*: Enter the date of the transaction in the YYYY-MM-DD format.
- Type*: Choose the type of transaction from the dropdown. If you're using your own spreadsheet, refer to the transactions list for accurate types.
- Amount*: The transaction amount. There is no need to be concerned about entering negative values for transactions such as Buy and Transfer Out, as they will be processed as negative values within Copia.
- Units: The number of units correspond to the transaction.
- Currency: The respective currency for the transaction.
- Notes: Include notes for each transaction; the notes will be visible in the Back Office.
Accounts Spreadsheet Import
- Account Name: The name of the Account. This will be the name represented within Copia
- Nickname: Give the account a nickname.
- Type: Select one of two types of Accounts: Connected Accounts and Virtual Accounts
- Entity: Enter the Entity that the corresponding Account rolls-up into. You want to make sure that the name of the Entity matches the exact name you have in your Entity Map.
- Account Number: Enter the Account Number that is used to identify the account.
- Default Manager: Your default manager will be the Manager that will be assigned to new holdings within the Account
Uploading the Spreadsheet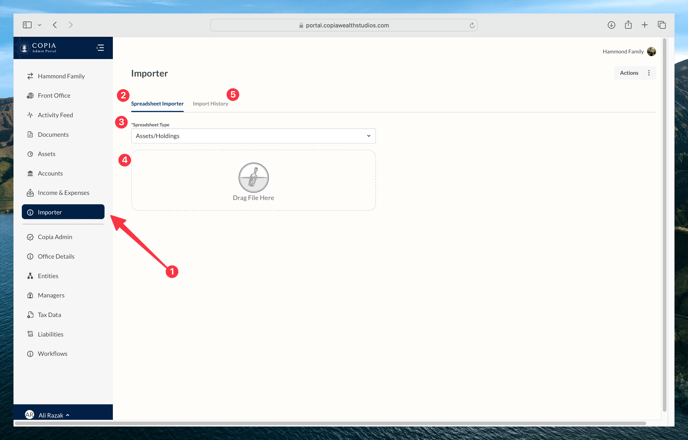
- Importer: Currently, the only way to upload the spreadsheet is via the back office. There is a tab that says Importer.
- Spreadsheet Importer: This is the tab where you can drag files into to upload spreadsheets
- Spreadsheet Type: In the Spreadsheet Importer tab, you will need to choose the type of spreadsheet import you are importing. Please note that you can only import one type at a time, and the available options are Assets, Transactions, and Accounts.
- Drag File Here: Drag the File into this box and you will get a screen as shown below
- Import History: In the Import History tab, you can access a comprehensive view of all imports performed for a specific office. It provides descriptions of each import and gives you the option to undo any import if needed. This feature is displayed as shown below.
Spreadsheet Import Screen:
Once you have dragged a file into the Drag File Here screen, a new screen will appear. On this screen, you can easily match the fields in your excel workbook with the corresponding fields in Copia. In most cases, the fields will automatically fill in.

After clicking next on the previous screen you will get to a review screen where upon review you must click the Submit button in the top right hand corner. In this example, there are no errors; however, errors will be highlighted in red.

Import History Screen:
The Import History Tab provides a comprehensive view of all imports performed for a specific office. Additionally, you have the ability to undo any import by clicking on the three dots, which has an option for removing all data associated with that particular import.